FAQ
I Cannot See MouseBoost In Finder. What Should I Check?
First check whether Finder Extension is enabled. The standard MouseBoost context menu comes from Finder Extension. If the extension is disabled, the menu will not appear.
Troubleshooting order:
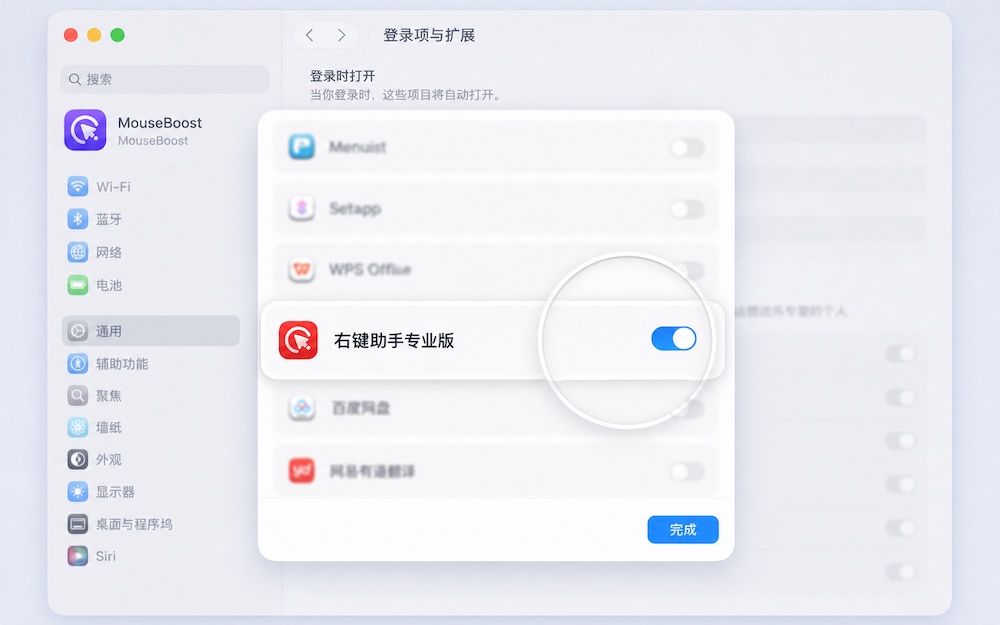
- Open System Settings and confirm that the MouseBoost Finder extension is enabled.
- Quit and reopen MouseBoost.
- Restart Finder.
- Test in a normal local folder first, not on an external disk or protected folder.
Different macOS versions may use different settings paths:
- Common path:
System Settings -> Extensions -> Finder Extensions. - Newer path:
System Settings -> General -> Login Items & Extensions -> Extensions -> File Providers.
If the context menu still does not work, restart Finder and try again.
How Should I Configure Trackpad Or Mouse Right-Click?
MouseBoost depends on Finder context menu behavior. If macOS secondary click is not enabled correctly, right-click behavior can also be abnormal.
Check these settings:
- Trackpad:
System Settings -> Trackpad -> Point & Click -> Secondary click. “Click or tap with two fingers” is recommended. You can also choose bottom-left or bottom-right click. - Mouse:
System Settings -> Mouse -> Secondary click. “Click right side” is recommended.
Why Can’t Mac Finder Right-Click Create New Files?
Finder does not include a full New File context menu by default. macOS usually expects you to open TextEdit, Pages, Word, or another app first, then save the file into the target folder.
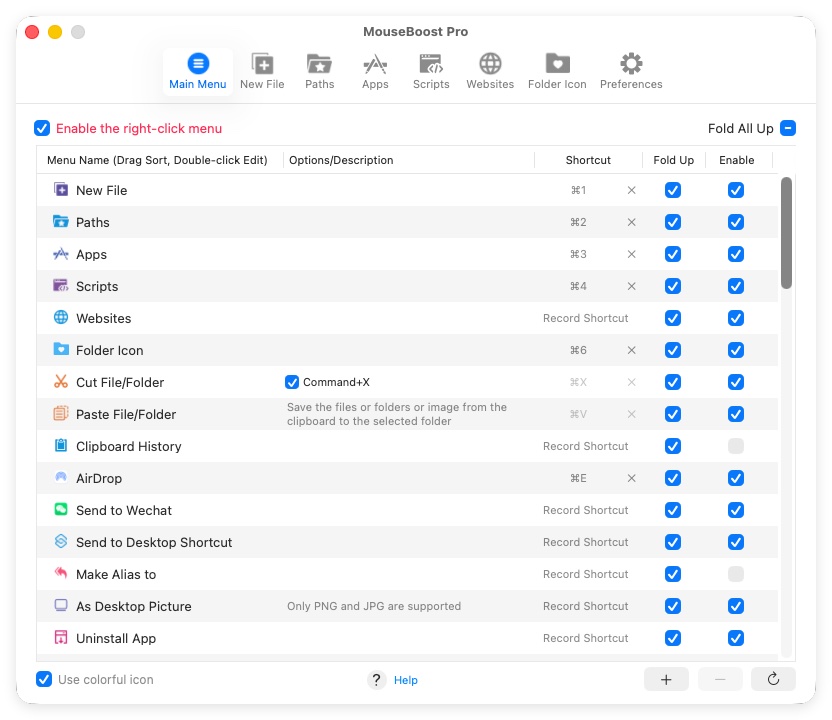
MouseBoost adds New File actions to the Finder context menu, so you can create TXT, Markdown, Office, iWork, web, script, or custom template files directly in the current folder. See New Files In Finder for details.
How Do I Create TXT Or Markdown In The Current Folder?
After installing and enabling MouseBoost, right-click in the current Finder folder, open the MouseBoost New File menu, and choose txt or md. You can also move TXT or Markdown near the top of the main menu to reduce nesting.
If the current folder is not writable, complete the folder authorization prompt. If the menu is missing in iCloud Drive or another cloud folder, enable Quick Access.
Which New File Templates Does MouseBoost Support?
MouseBoost supports TXT, RTF, Markdown, JSON, XML, Office, iWork, WPS, HTML, CSS, JavaScript, Python, Shell, and other common file types.
You can also save existing files as custom templates. Later, creating a new file from the Finder context menu copies the template content and can preserve the default filename and icon.
Why Do Some Menu Items Appear Only Sometimes?
MouseBoost filters the menu dynamically based on the current selection.
Common rules:
- When no file is selected, only actions that do not require a selection appear.
- Image tools only appear for supported image formats.
- Show Package Contents only appears for packages or apps.
- Eject only appears for selected volumes.
- Copy File Content only appears for readable text files.
- Uninstall App only appears for
.appselections. - Default Opener usually supports one file only.
- Duplicate Finder requires selecting a folder.
What Should I Do After Clicking “Enable Quick Access”?
Quick Access depends on Accessibility permission. After it is enabled, MouseBoost can show menus in locations where Finder Extension is limited.
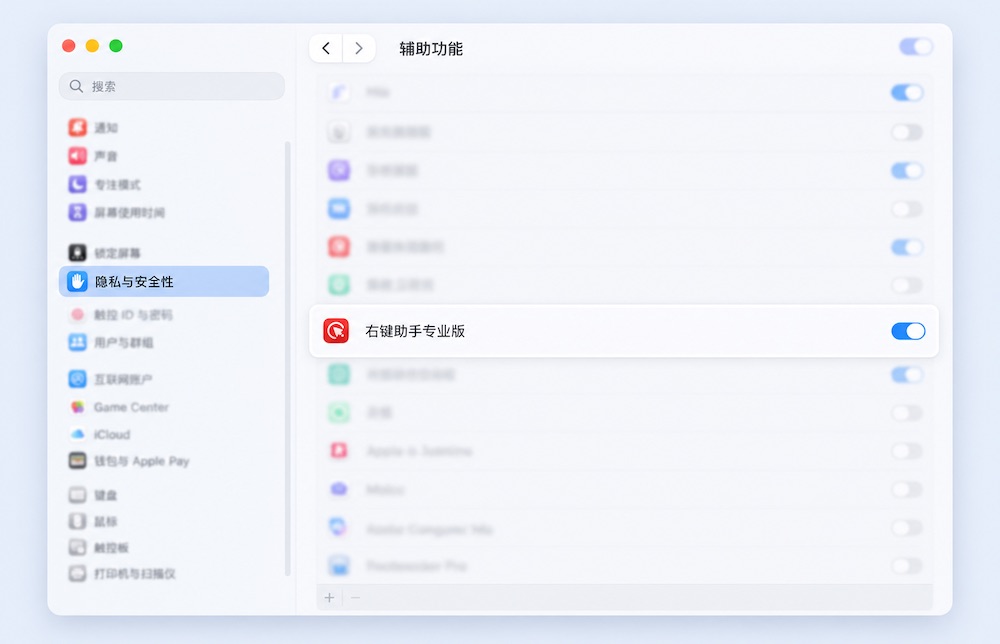
If macOS asks for authorization, go to System Settings -> Privacy & Security -> Accessibility and enable MouseBoost or MouseBoost Pro.
If MouseBoost says you need to select Finder first, click a Finder window first so Finder becomes the active app, then use middle-click, modifier-key right-click, or a shortcut to show the menu.
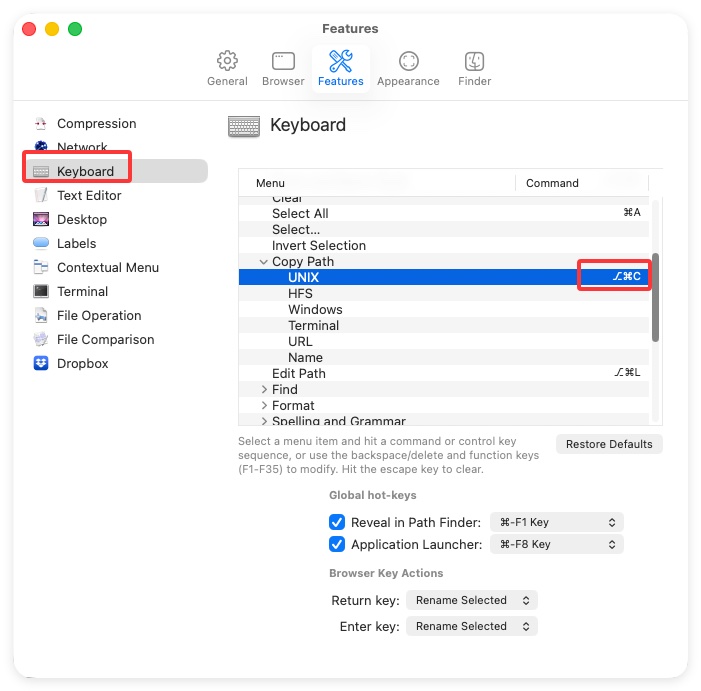
If you use QSpace, QSpace Pro, Path Finder, or another file manager, add that app in MouseBoost Quick Access settings. Path Finder also needs Features -> Keyboard -> Copy Path -> UNIX set to ⌥⌘C.
Copy, Move, Or Delete Fails On External Disks. What Should I Check?
Check:
- Whether MouseBoost has Full Disk Access.
- Whether “Enable external disks” is turned on.
- Whether folder authorization was completed on first external-disk operation.
- Whether the external disk is read-only.
- Whether the disk format supports macOS writing, because NTFS may be read-only by default.
- Whether the file is locked.
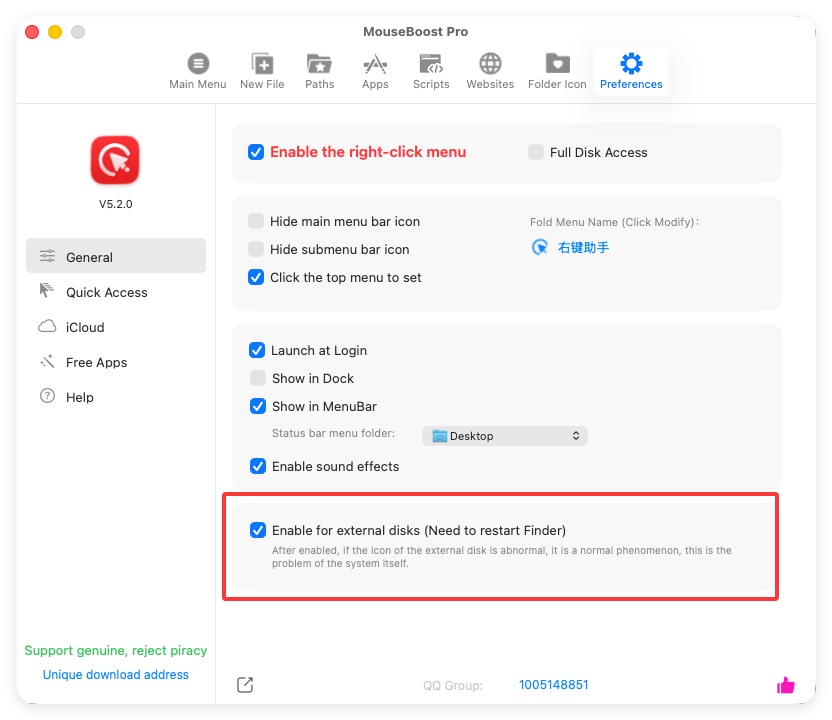
After enabling external-disk context menus, if the external disk icon looks abnormal, it is usually a macOS display issue and does not affect actual file operations. Restart Finder after enabling or disabling this feature.
Why Do I Need Accessibility Permission?
Accessibility permission is used to monitor and simulate keyboard and mouse events. MouseBoost features such as Quick Access, middle-click menu, modifier-key right-click, cut and paste, reading selected file paths from Finder or third-party file managers, and Keyboard Cleaner depend on it.
If you only use basic actions from the Finder Extension menu, you may not need every Accessibility-based feature. If you want Quick Access or enhanced cut and paste, granting Accessibility permission is recommended.
Why Do I Need Full Disk Access?
macOS restricts many folders for privacy and security. Full Disk Access reduces file-operation failures, especially for external disks, protected system locations, user privacy folders, app leftover file scanning, and cross-folder copy or move operations.
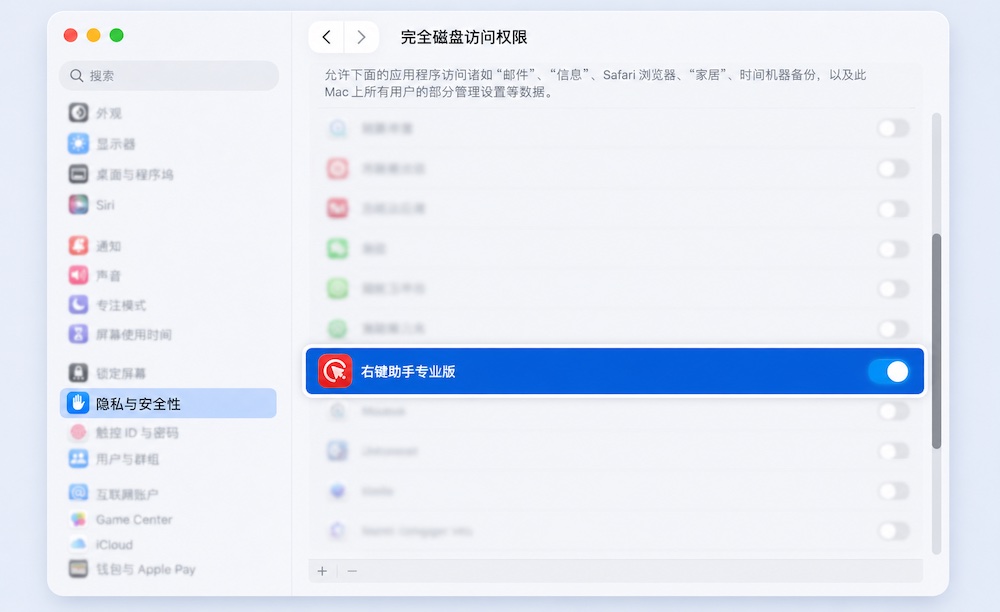
If you only use a few features inside normal user folders, you can leave it off at first. Enable it when you hit permission errors.
The Authorization Button Cannot Be Clicked. What Should I Do?
If MouseBoost opens a folder authorization panel and the “Authorize” button in the lower-right cannot be clicked, hold Command and click the button again.
To use the context menu as fully as possible, authorize the whole disk or a parent folder you often operate in. If you only authorize one subfolder, cross-folder copy, move, compression, and scripts may still hit permission limits.
Why Do Some Panels Say “Enable Component First” On First Open?
Some system panels or extension abilities need to enable a component before they can work. When you see this prompt, follow the instructions to enable it. If the feature still does not work afterward, restart Finder or reopen MouseBoost.
Which Features Need Screen Recording Permission?
Features that read screen content or help with screenshots may require Screen Recording permission. Restart Finder after granting permission.
Note: some macOS versions may still show the permission checkbox as unchecked after authorization. This is a display issue in System Settings. If the feature works, you can ignore the state.
Why Does Office To PDF Fail?
Office to PDF depends on the LibreOffice command-line tool. Install LibreOffice and make sure this path exists:
/Applications/LibreOffice.app/Contents/MacOS/soffice
If LibreOffice is not installed, MouseBoost prompts you to install it.
Why Is Image Background Removal Unavailable?
Background removal requires macOS 14.0 or later. It is unavailable on older systems.
Large images may take time to process. If processing fails, test with a smaller image first.
Does Image Rotation Overwrite The Original File?
Yes. Image rotation saves the rotated result back to the original file. Copy important images first.
Does Clipboard History Record Passwords?
MouseBoost ignores clipboard types marked hidden, transient, or automatically generated by the system. It also ignores password-manager clipboard types such as 1Password. You can also set ignore rules using app blacklist or whitelist.
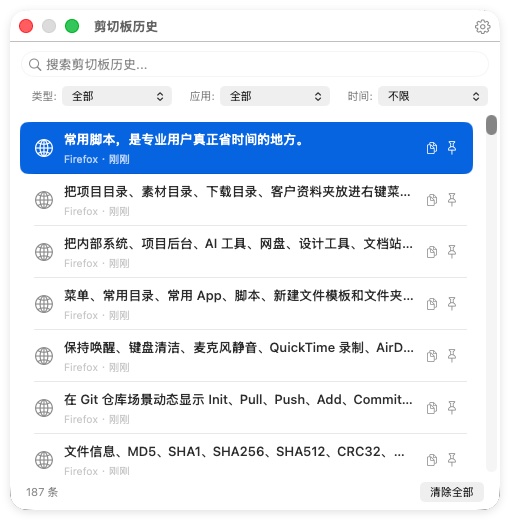
Any clipboard history tool involves privacy. Avoid enabling it on shared computers, or clear history regularly.
Why Did Clipboard History Miss One Copy?
Possible reasons:
- The content type is unsupported.
- The source app is ignored by rules.
- The copied content is empty.
- The content is marked private or transient by macOS.
- Content written by MouseBoost itself is ignored to avoid recording loops.
Send To WeChat Does Not Work. What Should I Check?
Send to WeChat depends on WeChat and the macOS share service. Confirm:
- WeChat is installed.
- WeChat sharing is enabled in macOS extensions or share services.
- The current selection is supported by the WeChat share service.
If the share service is not enabled, MouseBoost prompts you to open System Settings.
Third-Party Terminal Menus Do Not Open. What Should I Check?
Confirm that the terminal app is installed and that the system service is available. MouseBoost supports Terminal, iTerm2, Ghostty, cmux, Kaku, and other entries, but third-party terminals need the matching app.
If a default terminal Bundle ID is configured, MouseBoost uses that terminal first.
Why Did A Common Script Fail?
Common Scripts can put Shell scripts or AppleScript into the Finder context menu, but scripts still follow macOS permission rules.
Common reasons:
- The script accessed a folder without authorization.
- The script requires administrator permission.
- A command-line tool is not installed or is not in the script execution environment’s
PATH. - The selected file is being used by another app.
- The script involves system permissions that cannot be executed directly.
If the app says execution failed and may not have permission, grant MouseBoost Full Disk Access first, then test a simple script in a normal local folder.
What Do Script Path Placeholders Mean?
MouseBoost supports placeholders that read information from the current right-click selection:
@rfpath(s): selected file or folder paths.@rfpos(s): location of selected files or folders.@rfname(s): selected file or folder name with extension.@rfnam(s): selected file or folder name without extension.@rfext(s): selected file extension.@rftocommonpath: show favorite folder picker.
Note: overusing @rftocommonpath in scripts may slow context menu loading.
What Should I Check Before Batch Rename?
Batch Rename changes real filenames. Recommended:
- Test with a small set of files first.
- Carefully check old and new filenames in the preview.
- Do not batch rename files that are syncing or being used by another app.
- Back up important files first.
Will Configuration Sync Overwrite Local Settings?
Downloading configuration from iCloud or importing a configuration file changes local menus and preferences. Export a local backup first.
After automatic sync is enabled, local configuration changes are synced to iCloud automatically.