Getting Started
This guide walks through the full flow from installation to first use. Because MouseBoost integrates deeply with the Finder context menu, you need to enable the Finder extension and grant the required permissions during first setup.
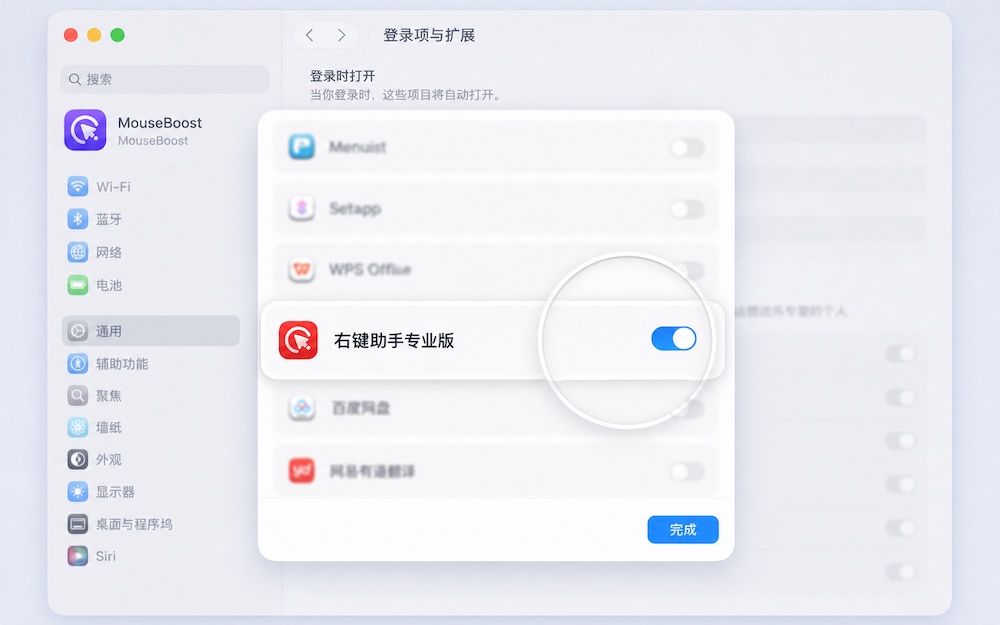
1. Install And Open MouseBoost
- Install MouseBoost or MouseBoost Pro.
- Open the main app for the first time and enter the settings or permission guide.
- Keep the main app open at least once so it can initialize context menu configuration, shared containers, default templates, and the clipboard database.
MouseBoost has two editions:
- MouseBoost: the standard version. It is free to download and can be upgraded to Pro through in-app purchase.
- MouseBoost Pro: the standalone paid version. It includes Pro capabilities after purchase.
Most workflows are the same in both editions. The docs use “MouseBoost” as the default name.
2. Enable Finder Extension
The Finder context menu comes from Finder Extension. If the extension is not enabled, MouseBoost will not appear in the Finder context menu.
Recommended steps:
- Open System Settings.
- Go to Privacy & Security or the Extensions-related settings.
- Find the Finder extension or MouseBoost extension.
- Enable it.
- If the menu still does not appear, restart Finder or log out and back in.
The MouseBoost settings page also provides an entry to the extension management screen.
3. Enable Accessibility Permission
Some abilities require Accessibility permission, including:
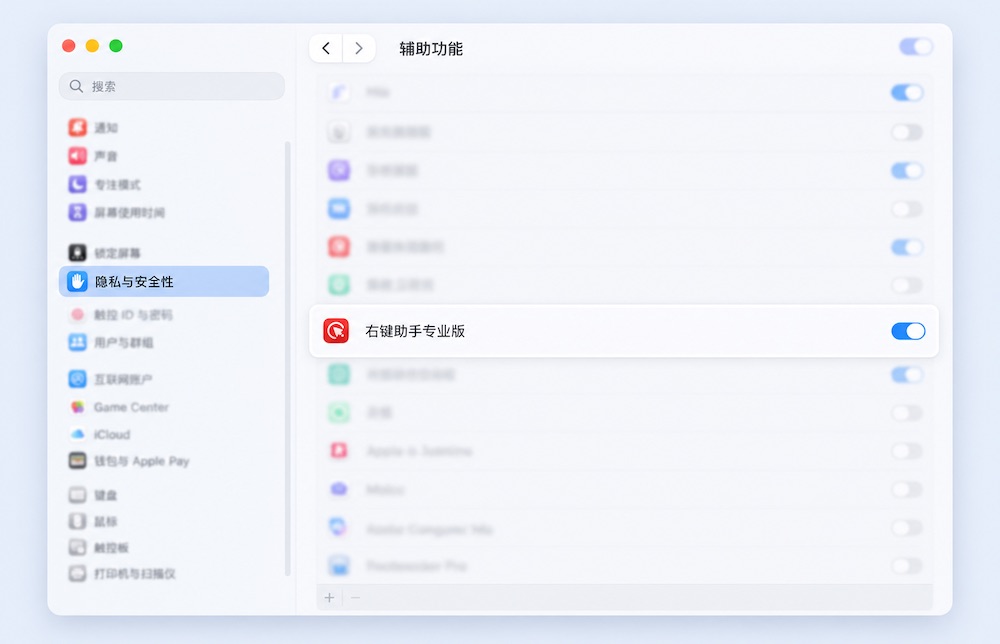
- Quick Access menu trigger.
- Override system context menu.
- Show MouseBoost menu with middle mouse button.
- Hold Shift / Control / Option / Command and right-click to show the menu.
- Simulate copy, paste, cut, and selection-path reading in Finder.
- Enable
Command + Xfile cutting. - Keyboard Cleaner input blocking.
The usual permission path is:
System Settings -> Privacy & Security -> Accessibility -> add and enable MouseBoost.
If permission does not take effect, quit and reopen MouseBoost, or restart Finder.
4. Enable Full Disk Access
When MouseBoost needs to access protected folders, external disks, some system folders, app leftover files, cross-folder copy/move operations, or cleanup actions, it may require Full Disk Access.
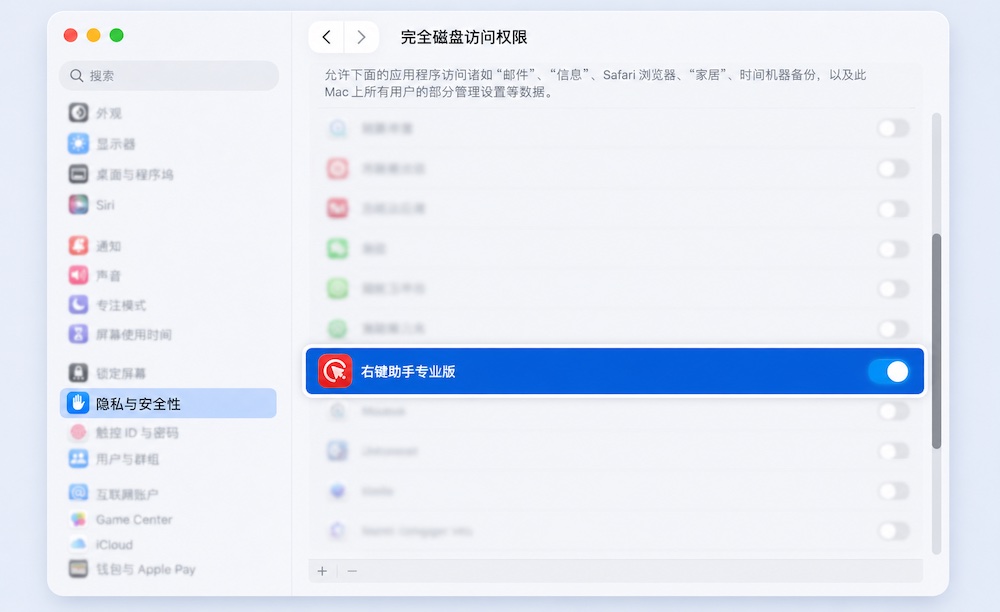
The usual permission path is:
System Settings -> Privacy & Security -> Full Disk Access -> add and enable MouseBoost.
Recommended scenarios:
- Copying or moving files in protected locations.
- Delete, force delete, or Move to Trash.
- App uninstall and leftover file scanning.
- External disks, system folders, and paths outside the user folder.
- Reducing authorization prompts during large batch operations.
5. Enable Quick Access
In addition to the standard Finder extension menu, MouseBoost provides Quick Access. After enabling it, you can show the MouseBoost menu with middle-click, shortcuts, or modifier-key right-click.
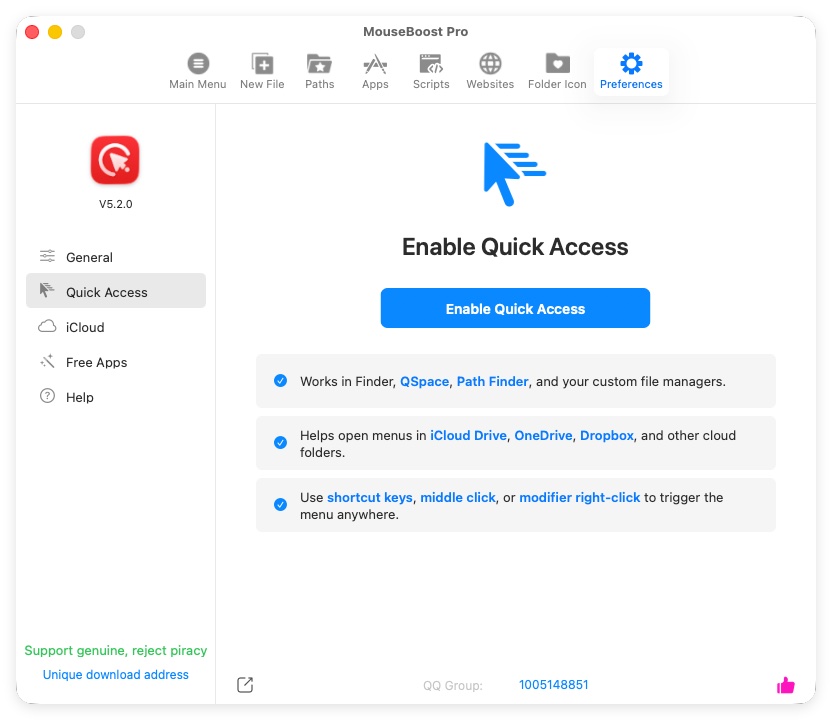
Related settings include:
- Enable Quick Access.
- Enable middle mouse button.
- Hold a specified modifier key and right-click.
- Add supported file managers such as QSpace, QSpace Pro, and Path Finder.
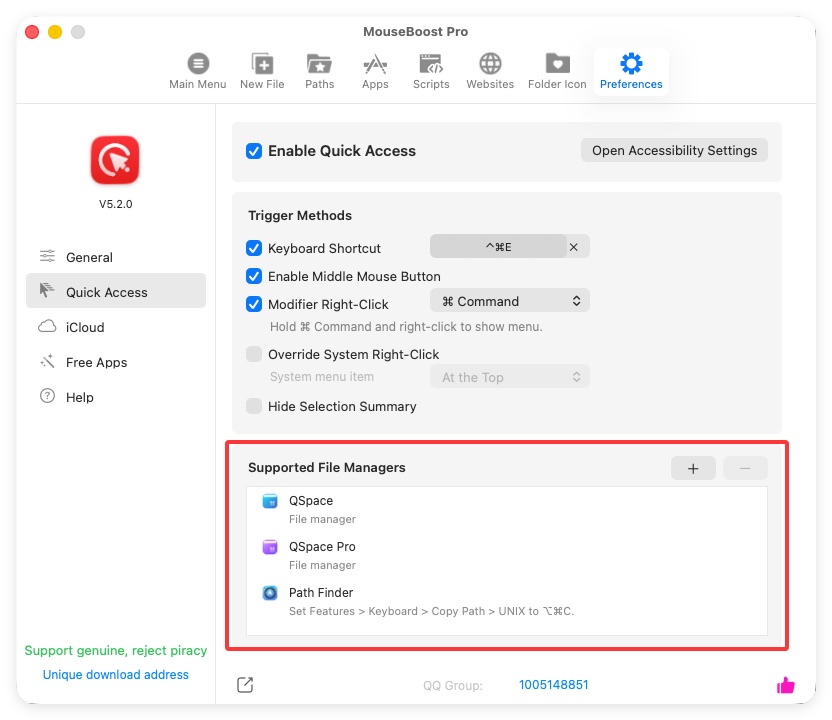
These abilities depend on Accessibility permission. If macOS has not granted Accessibility permission, related options may be hidden or unavailable.
If you use Path Finder, set Features -> Keyboard -> Copy Path -> UNIX to ⌥⌘C in Path Finder.
6. First Context Menu Test
- Open Finder.
- Select a file or folder on the Desktop or in a normal folder.
- Right-click to open the menu.
- Find the MouseBoost menu or folded menu.
- Try low-risk actions such as Copy Path, New File, or Open Terminal Here.
If the menu does not appear, see FAQ.
7. Recommended First Configuration
For first use, consider these setup steps:
- Organize the context menu in the General page and keep only frequent actions.
- Add common file types or custom templates in the New File page.
- Add Downloads, project, asset, and temporary folders in Favorite Folders.
- Add common editors and tools in Favorite Apps.
- Keep or add your own Shell / AppleScript scripts in Common Scripts.
- Assign shortcuts to frequent menu items in the General page.
- Enable or disable status bar icon, Dock icon, sound effects, and launch at login in Preferences.
- If you use Clipboard History, check max history count, double-click behavior, and ignore rules.
8. Verify The Installation
Use these actions to verify MouseBoost:
- Right-click any file and use Copy Path. Confirm the clipboard contains the file path.
- Right-click a folder and use Open Terminal Here. Confirm the terminal opens in that folder.
- Right-click a normal image and check whether image conversion, resize, and crop menus appear.
- Copy text and open Clipboard History. Confirm the recent copied content appears.
- In the settings page, open Finder Extension, Accessibility, and Full Disk Access entries and confirm permission status.